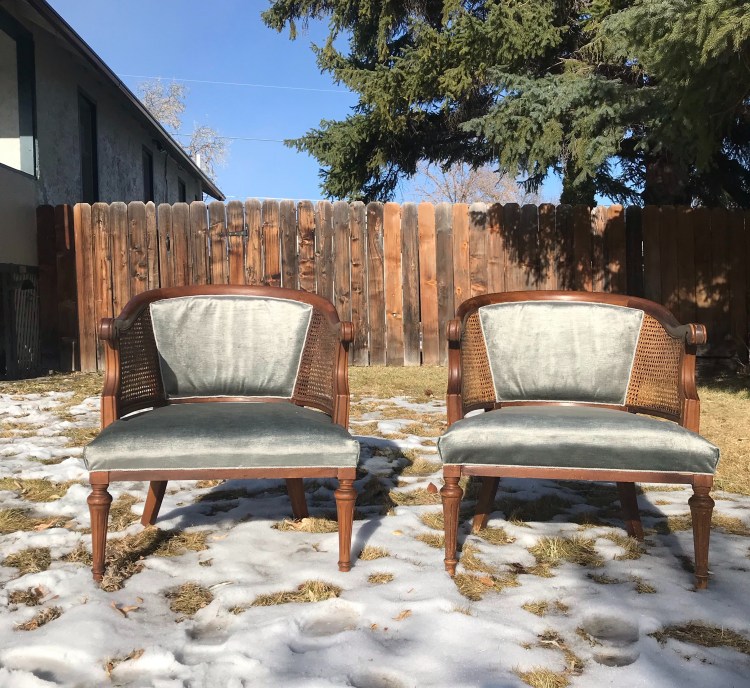
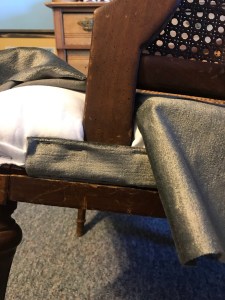
Last year when we bought our house, a wonderful friend from church texted me a picture of two beat-up, cane backed chairs and said, “would you like these for your new house?” Maybe this is a strange request, but not to me – up-cycler of hidden relics. It took me a while to follow up with her about the chairs because summer on the urban farm is all encompassing, but once we hit October it becomes making winter season [this stretches from October to April in Montana]. Wintering properly [and in a pandemic] is a serious skill to which I have dedicated myself these past thirteen winters. I would rise to the occasion once again.
I sort of hate the way that DIY and especially cooking bloggers embed a narrative into their how-to. Who cares about your great-grandmother I just want her pecan pie recipe! But also I see the value in it [and am about to do the same here] because all craftsmanship and handiwork are also about the thinking and associations occurring within the process, not just the result. Much of working with one’s hands is about the muscle memory that allows the mind to wander, explore, imagine. Yes, I am sanding a floor, but inside I’m remembering my father sanding a floor and the symmetry of a set of cultural behaviors implicit in craft. Yes, I am baking a cake but I am baking my grandmother’s cake and within it my memory of her kitchen and her memory of her grandmother’s kitchen.
Working through restoring these chairs, that I know my good friend also reupholstered once herself and were in fact the first pieces of furniture that she and her husband bought as a couple, connects me to my friend and her life. They connect the next person who owns these chairs to both of us through the tether of physical objects which I have long felt to have their own anima while they serve as talismans for the living, as loci of the invisible lives of ordinary people.
I only want old, wise things. I never want something that is new when I can have something that is vintage, or thrifted, or reused, or up-cycled, or restored, or reincarnated. I am not a collector of rare pieces for themselves, I am collector of the humanity of every day objects, the souls of the departed who used and loved them, who made their very lives of them.
For the process of restoring these chairs I wanted partially to document the method, though there are certainly better resources for this, but also the reveries and fantasies as they passed through my mind.
Step 1
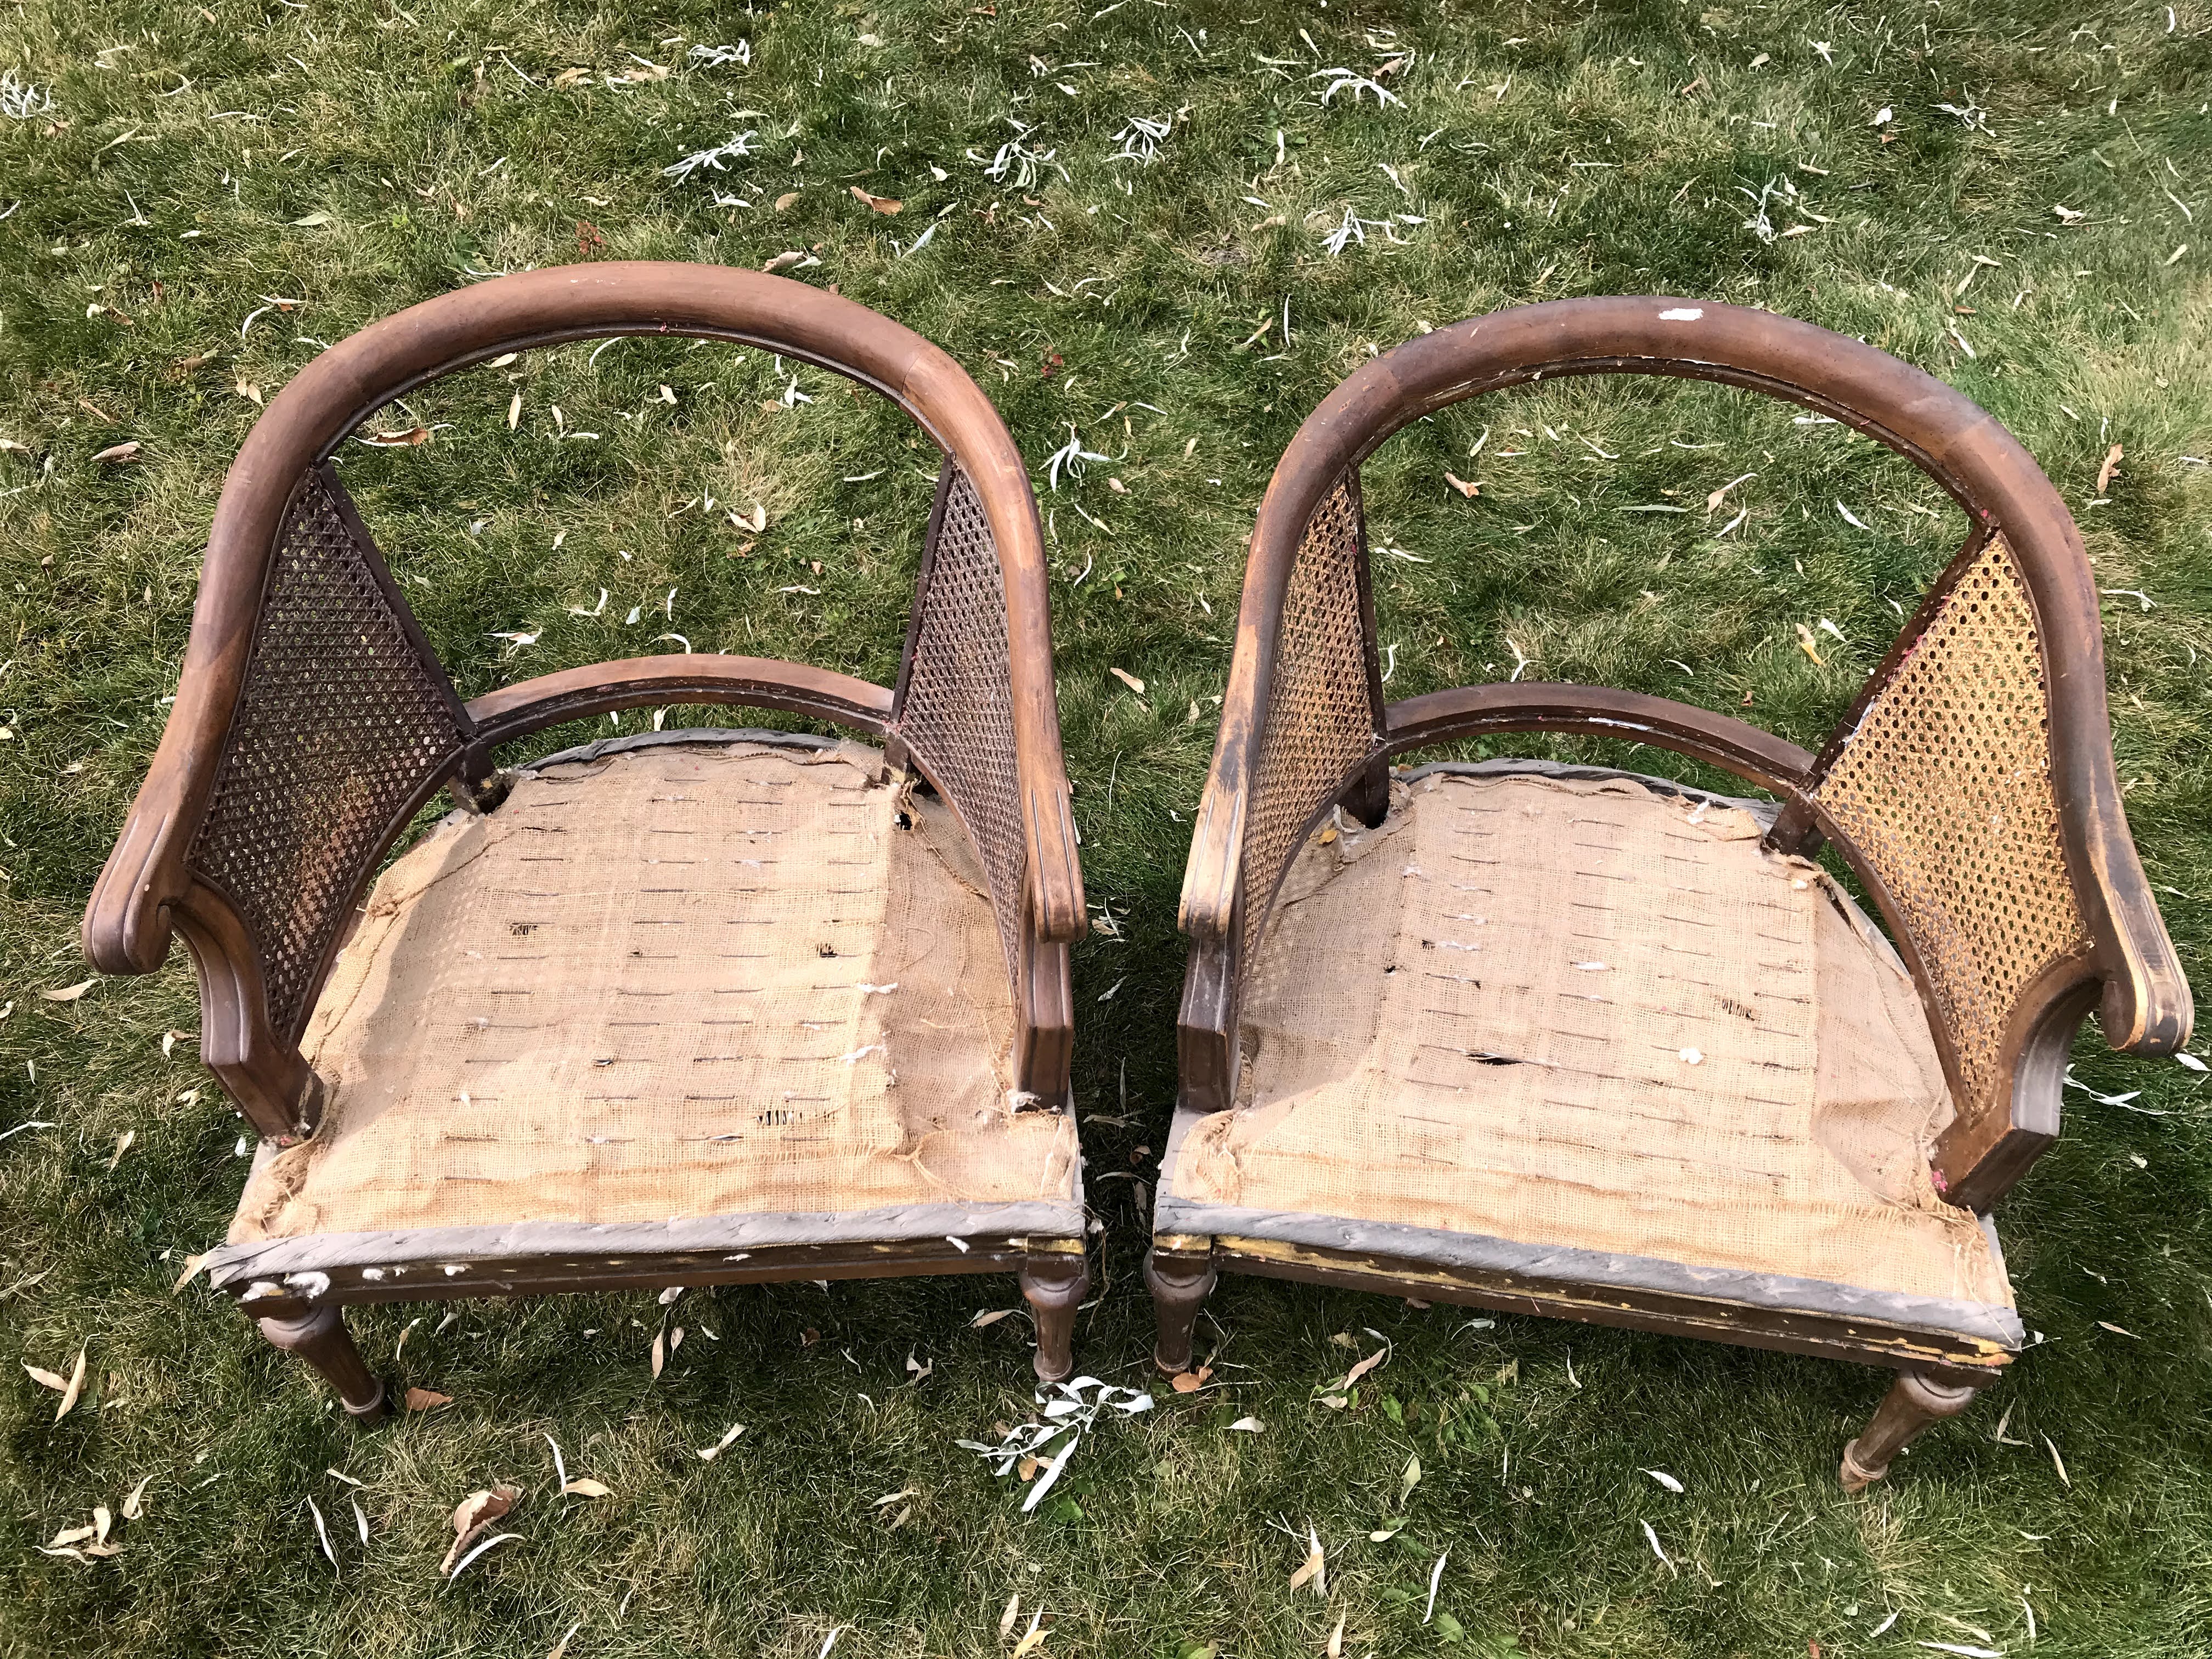
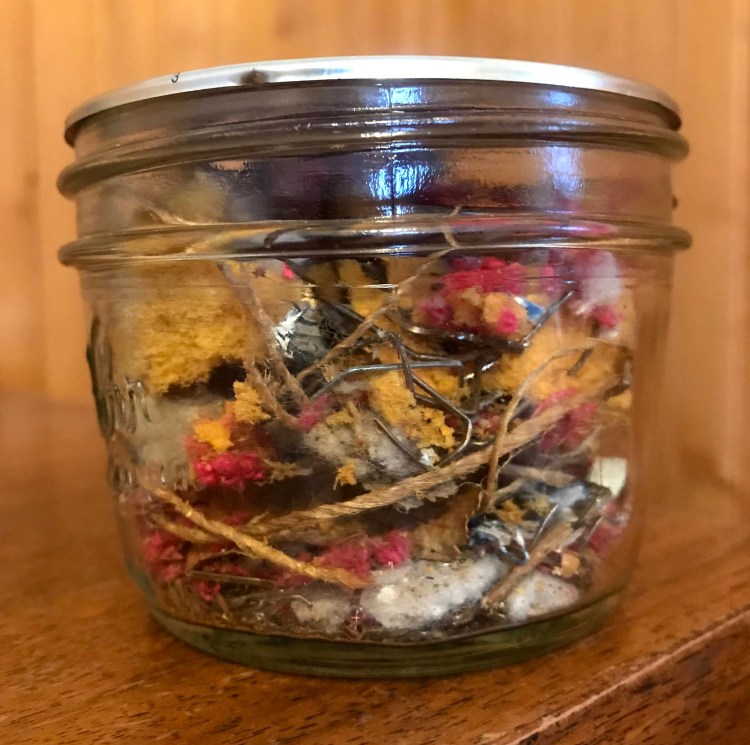
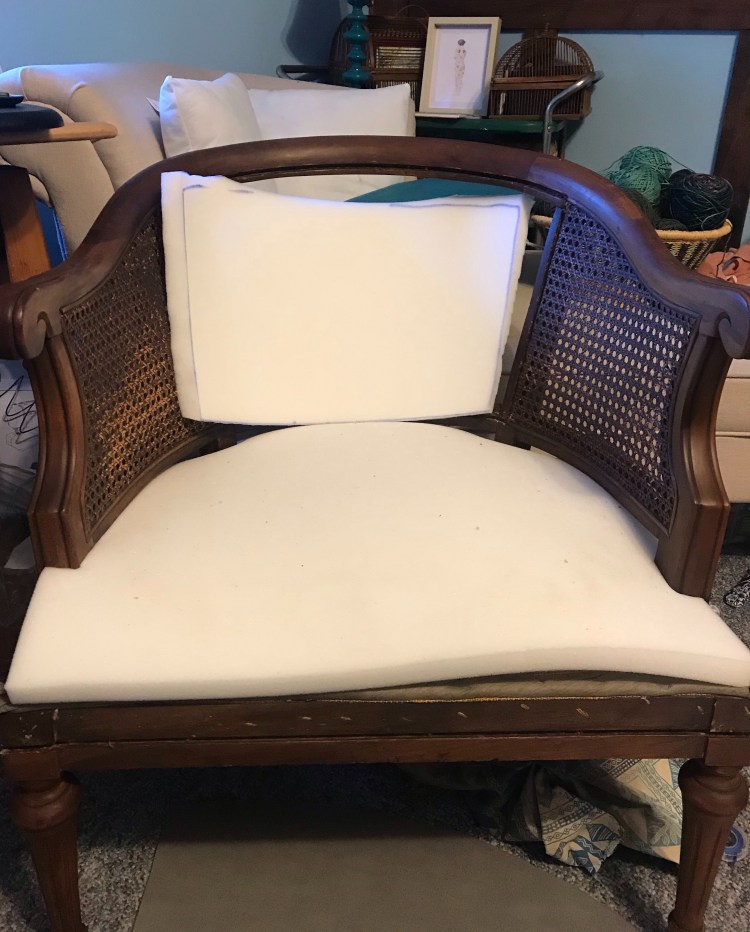
Chair cleaning while listening to Desert Notebooks by Ben Ehrenreich. About time. And I realized – though the author does not use this word – that the chairs and also the experience of their history is a palimpsest. Probably you should read this book if you ever have to restore chairs and want to feel grounded in both the present and the immensity of time [chair restoration optional]. I removed 1/2 a pint of staples and errant foam – this is not a zero waste activity [check out my mason jar], but it does keep a lot of material from going into a landfill [the entire chair]. Also, the process took forever. I finished the last section of the book.
Step 2
Cutting the seat foam. It is technically plastic and yet it seems both luxurious and not thick enough to sit on. I am not sure how to cut the foam for the back of the chair, but now the kids want to help so I need to calmly give them tasks they can do while keeping those for myself about which I am least sure. My second kid cuts a very straight line in the foam. She is confident in this brand new task because her mother is making it seem approachable – who doesn’t reupholster chairs for fun? I’ve watched hours of YouTube videos and I’m still nervous.
I have learned that non-experts should be wary of technical things, or feel wary or perform a lack of confidence. A good friend makes almost all her own clothes [she works full time and has a toddler, I am in awe of her]. When I reupholstered my last chair [a mid-century modern affair with clear Danish lines – something easy] she said “I heard upholstering is hard!” I guess. Making your own jeans is hard. Making a fitted coat with a fancy lining is hard. Maybe because all of it is hard, none of it is. Humans invented upholstery and I am a human. I think this means I can also make my own jeans.
I make many cuts in the foam for the back. I suspect that, as with all cutting, if something did not begin large enough then no amount of cutting can add more material. I think there is an axiom about this…but I am rolling with it.
Step 3
Cutting the muslin to cover the foam. I am using an old fitted sheet that had a bad rip and was too threadbare for proper patching. It became part of my schmattas. This is a word from my childhood. It’s Yiddish, and like so many Yiddish words the women in my family say, I had to look it up. It is a real world. My knowledge of Yiddish terms is entirely aural. It’s like a magical language for women who were never taught to read. My great-grandmother, Blanche (nee Bluma), was able to read, write and speak at least 6 languages [but not Hebrew because she was a woman]. She would not really teach any of us to speak Yiddish, though I asked. Hoarding this fitted sheet with my other schmattas [it just means rags] made me feel like my dad and my grandmother [in the pejorative]. But now that I am not having to buy new muslin for this purpose I also feel like my dad and my grandmother, but triumphant. Sometimes that depression-era mindset really does pay off [at $1.48 a yard!].
“You’re really good at this,” says my first kid. He means saving less than he means upholstering. I don’t say, “your mother has excellent poor people skills.” Instead I say what my dad always would say, “you never know when you might need something.” I don’t want my kids to be hoarders, but I also kept this fabric out of the landfill and now it is being reused. Maybe they won’t hoard fabric if they don’t want to reupholster furniture or mend their clothes. He asks me why I like to reupholster things and I say it is because I like nice things with history but those things are expensive. “How expensive?” “At least $500 for these chairs as a matched set.” His eyebrows go up, “how much were the chairs for you?” “Free.” “FREE?” My son realizes that his mother just made up money out of some time and thin air [this is all that money is] – plus $48 of foam, staples and fabric. Suddenly the thrift that lives deep inside me begins to make sense to him.
Step 4
Cutting the velvet. I am supremely grateful to my friend for including her original fabric because it gives me the perfect template for cutting mine. I cut the pieces out using my mother’s old fabric scissors. Her old pins hold the template to the new fabric as I cut. Looking at the templates laid out on the velvet, I am confident that I will have enough fabric for the back and the front of the backrest as well as the seat – even if I am having to add a few inches for the extra foam. I congratulate myself for getting the grain of the fabric to go the same way in all cuts. Spatial reasoning for the win.
I had made a decision at some point in this process that one chair is better than the other because the wood is in better shape. I decided that I would staple that chair second because I want it to be the best chair. The chair that I will sit in when the chairs are in their final place in our greenhouse. So I won’t staple it or cut all its foam until I have done the second best one, as practice. To truly have them be the same, I know I should do them together, but I want to learn more as I go. Learn on the worst chair. Perfect on the best chair. For cutting though, I cut all the fabric together, as I should have done for the foam.
Step 5
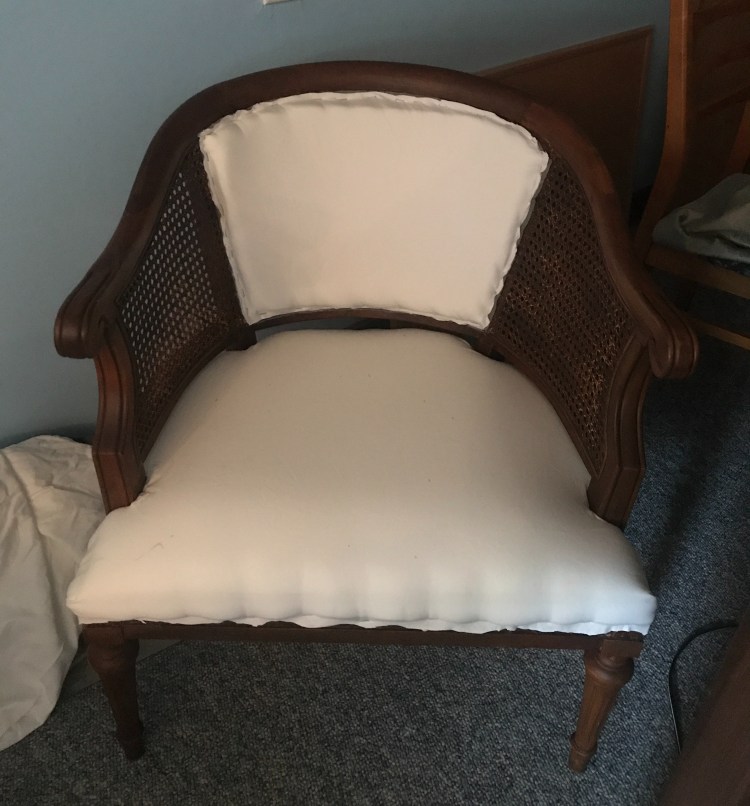
Attaching the muslin over the foam. I grab the stapler and secure the muslin to the second best chair. As I work I practice modeling encouragement, positive self-talk – parenting myself – every time I do it well I say “good girl” under my breath and [more importantly] every time I do it wrong I say, “that’s ok. you’re learning.”
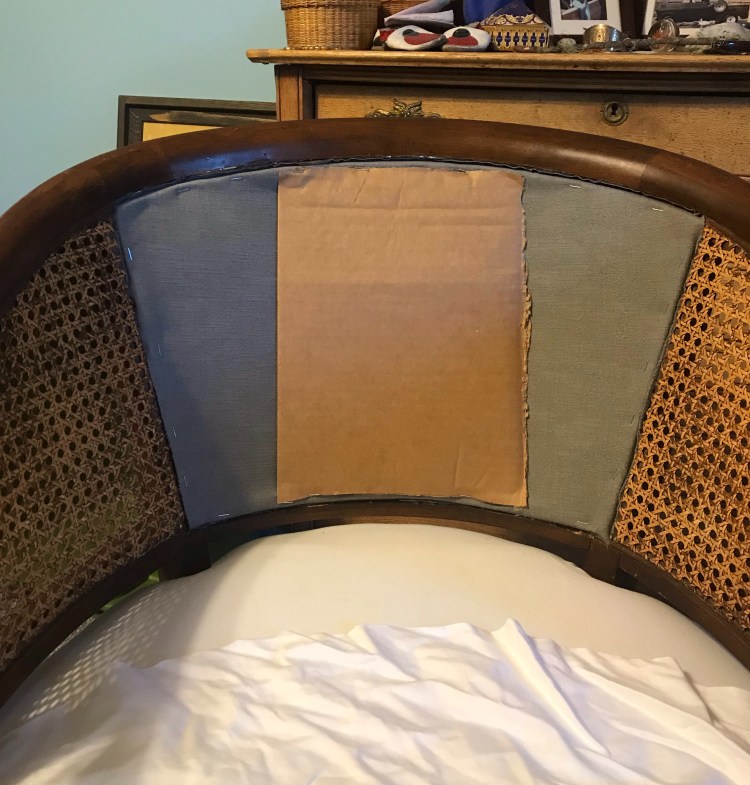
It takes a lot of hand strength to staple with one hand and hold the fabric optimally taut with the other. I want the fabric to give when I sit or lean on it, so it can’t be so tight that tears at the staples and it can’t be so loose that it puckers when no one is sitting on it. I had to cover the back facing part of the backrest with velvet first, add a layer of cardboard [the internet wanted me to use straps here, but I wasn’t sure that I had room in the grooves for all that fabric] to make sure that it would be firm. I congratulate myself on having gotten the right side of the velvet facing out before I staple in the backrest and pick up the foam.
There comes a point when I am turning the chair around to its back and stapling the muslin around the foam – that I had trimmed so many times – that I realize HOLY SHIT I am about to pull this off! And that is why I love doing things like this: because it is thrilling to succeed when you have never done something before. So I don’t need to jump out of airplanes to feel alive.
Step 6
Testing. The kids come and sit in the muslin chair. They say it is so pretty, even in white. My second kid sits and leans gently against the back. Her eyes light up, “I can lean on it! I can depend on it!” Every time my children learn that things are made by people, I delight. I tell them about the holy shit moment and the first kid asks, “so you didn’t know if it was really going to work?” He needs to know these things. “No, I thought it probably would work, but one can never be completely sure of a first success.” We eat dinner.
Entr’acte
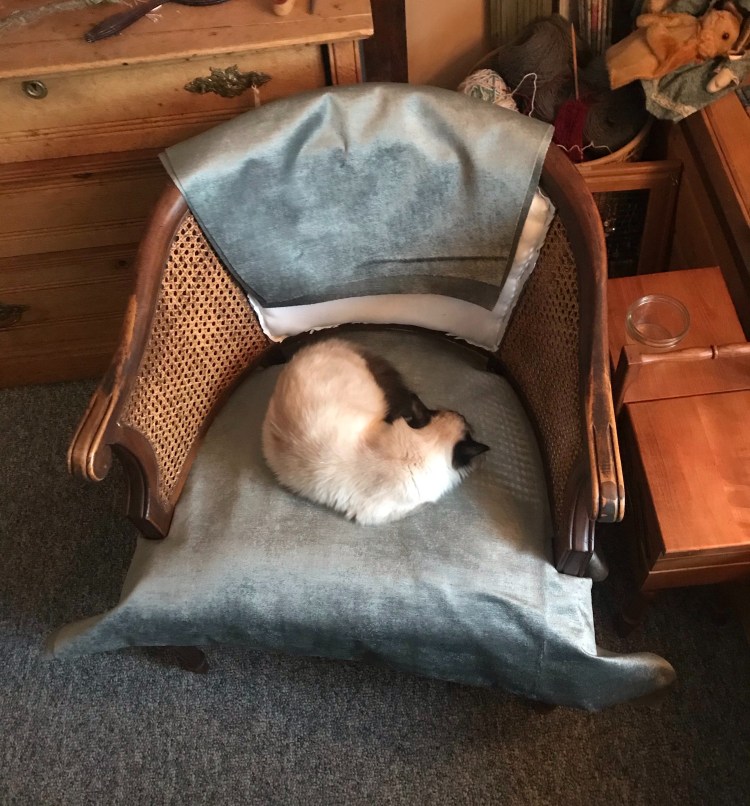
Then I took some time off. Over a month. It is sometimes difficult to find the time for hobbies when you have an overwork problem [that you don’t want]. During the interlude I migrated a server and worked several weeks over 50 hours, a few over 60, too many weekends. The chairs sat in my home office taunting me, half done. The kids would sit in the second chair when they needed me to help them with digital schoolwork while I was also working. The cat napped in it while I sat in all day working meetings. I felt like the we were already using it the chair.
In this time I took few breaks, but on one sunny day I went out to the greenhouse [where the chairs will go] to eat my lunch, get some sun vitamins and watch the birds at the feeder. I lamented that there was nothing to sit on. With the server moved, and customers in a stable production environment, I took off a Friday and set to work to do finish what I had started.
Step 7
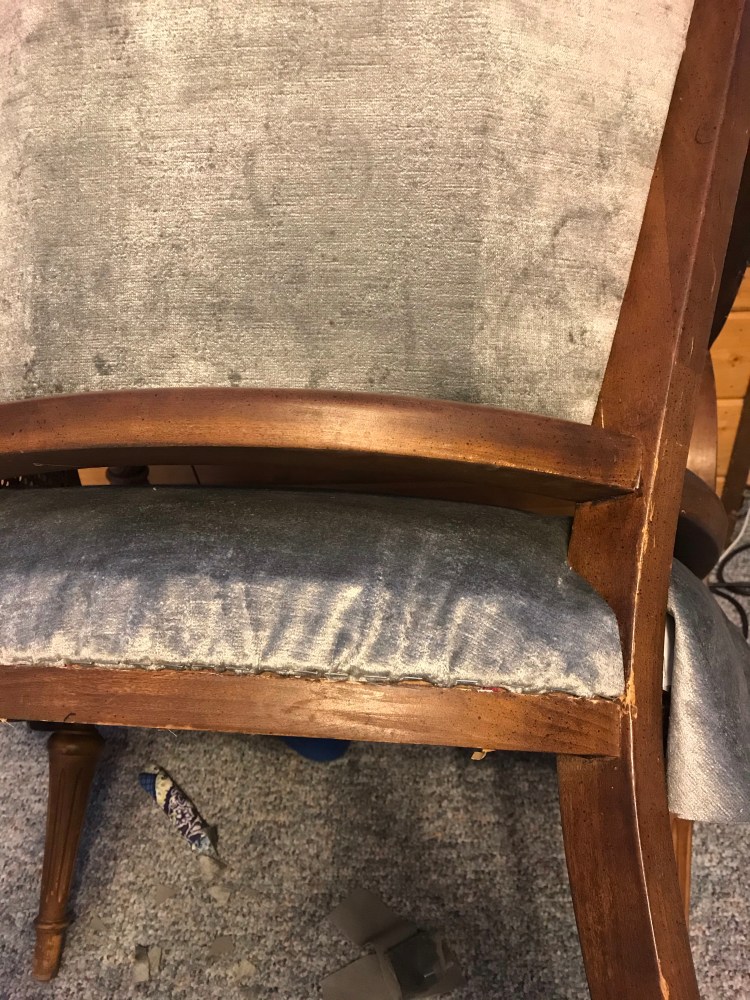
Attaching the velvet. I am nervous. I got a newer, fancier stapler because I am concerned that my old one doesn’t have deep enough staples to get through the fabric and pierce the wood at the back of the groove. We’ll see how this goes. I have progressed from my last audiobook and am now listening to Caste by Isabell Wilkerson. There is a little spot below each arm rest where I cannot drape seat fabric because of the angle. I cut and fold these little pieces first, while listening to an historical accounting of black people being forced to wear cheaper fabrics in their clothing. I don’t try not to think about about this fact, but also I try to think about what I am doing, both considering that velvet is a costly fabric and I am white, while trying to concentrate as I fold the fabric into the spot and try the first few staples in the groove. It’s a clean line and I am satisfied.
I move to the back of the chair which is curved and therefore a struggle, but also largely out of sight. At some point in my conceptualization of this part of the process, I wanted to be able to staple in a way that defies space and time so that the edge of the fabric was even in the groove and the staples were invisible. Hundreds of years of upholstery technology should have demonstrated to me that true experts have given up on this and either employ welt or visible upholstery staples. Though either would have been appropriate for these chairs, I thought I could get away with neither and spend a very long time trying to deny reality. I begin to realize that there is no wisdom in folding the edge under for a “clean” look because that is what I have the welt for and resolve to stop all that nonsense.
Still, dealing with the curve of the back of the seat is slow going. I am unsure what lesson I learn about the best method for this part. Probably start from the edges and work in? I remove all the center staples and start again. So many more staples are removed then left in, but I come to a place where I concede it looks passable with the welt draped over the staples and a pile of tiny silver triangles littering the floor. Because of the curve you have to trim out triangular sections of the fabric or the drape is all wrong, but I am not sure what the appropriate ratio of the cut out to not cut out is. It seems that every time I think I know where to cut the fabric I have not been aggressive enough. I did not have this issue with the muslin because was thinner and I was not dealing with fitting it into the groove: I knew I would cover all the muslin and it therefore did not matter.
It begins to goes smoother by the time I get to the front of the chair, but the heel of my hand smarts every time I staple. This is the steepest part of the learning curve. I do learn to cut an aggressive triangle that is much larger than I think it should be in the center of where I know the fabric will be pulled down to the groove, and then staple. But I do not have the words to truly describe what I have learned here.
Step 8
Attaching the backrest velvet. I learn that I should have done this before I did the seat, maybe even before the foam went on the seat. I had thought the stapling on the back would be more difficult than the seat because of the shape of the back is not even a little square and is in fact slightly concaved, but it is actually easier. The backrest is less three dimensional, somehow, probably because I dealing with a mostly flat plane instead of the top and sides of the seat. Mercifully, there are no little – or big – triangles to cut out of the velvet. The only thing that makes the backrest staples harder is the seat itself. There is limited space for the stapler to fit at an angle that I am also strong enough to depress the staple trigger. I worry about damaging the nap of the seat fabric by snagging it with the stapler and ruining the entire thing. But this does not happen. Note to self…
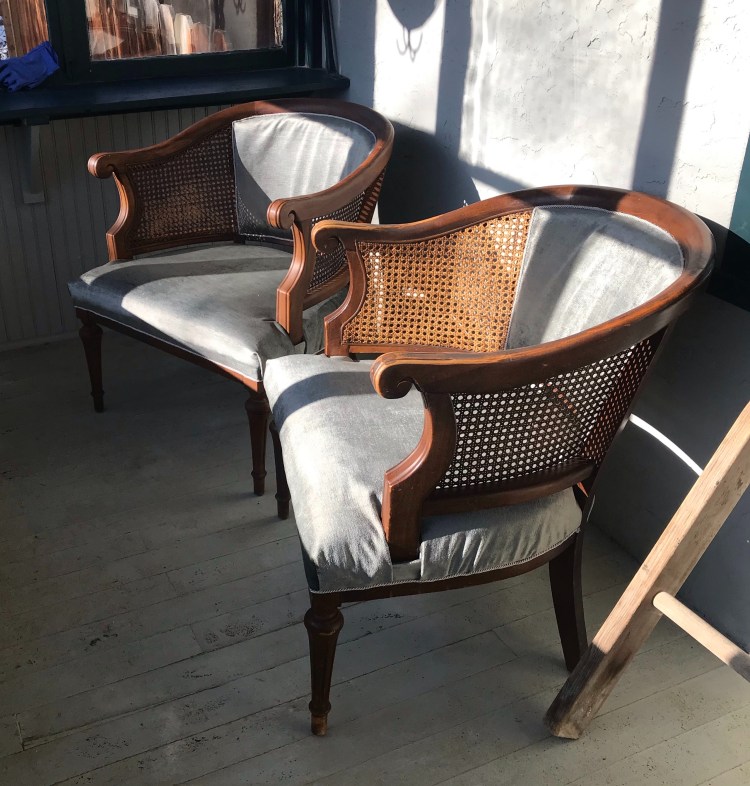
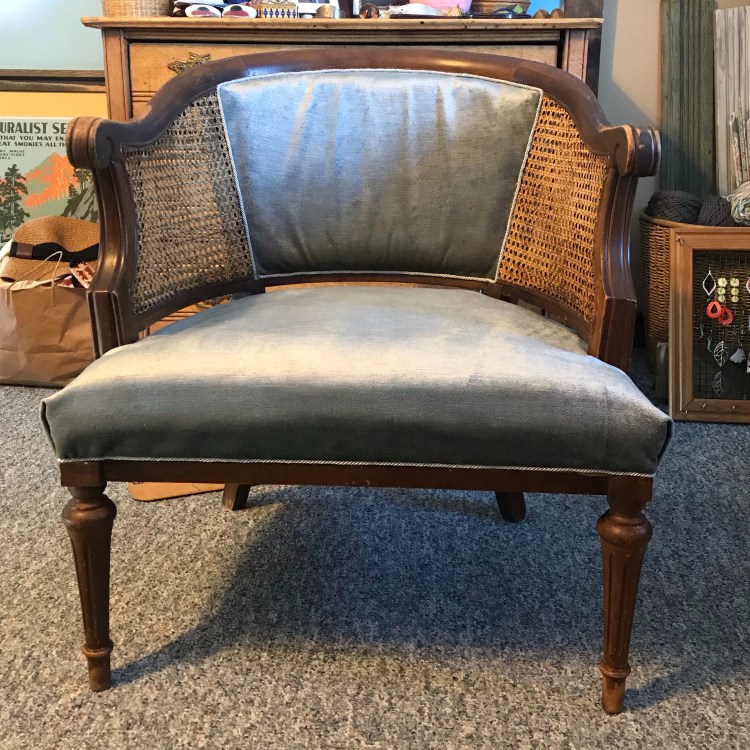
I have now attached all the velvet and though I see a thousand places it is not perfect, boy howdy: look what I have accomplished!
Step 9
Applying the welt. Time to fire up the glue gun. The internet told me that I could sew the welt on, but F that S: I know how long that will take and I am not confident in making my stitches invisible. I am slightly concerned about removing the glue should I ever want to re-re-re-upholster this chair, but decide that that is a problem for future me. I was already nice to future me by not gluing down any foam. You’re welcome future me.
The welt was expensive [by this I only mean, I have to buy it instead of having it on hand] and I didn’t want to buy it in the first place [see Step 7] so I am both distressed that I somehow mis-measured and that the cat is going to destroy all the welt thinking it is her toy. I have to banish her from my studio. I wrap the welt four times around the base and conclude that I have enough. Hallelujah.
In which our heroine realizes her fingers will be melted. Thankfully, I am already an expert glue-gun operator and can apply a thin bead over the staples and avoid the wood. I begin to feel as though future me has little worry about should she decide to do this again. It is hard to keep the satiny welt from unraveling when I cut the ends, so there are some spots that it is not completely nice looking, before I realize I should fold it over in the groove, glue it down and then cut the end underneath very close. Thankfully, I started in the back again. As I glue, I can see how much my stapling technique improved across the chair.
This marks the end of the chair that is not as good. One down. One to go!
Step 10
The best chair goes second. It is amazing how much faster it goes having learned on the not-as-good chair. It is also interesting that, though I definitely know more about what I am doing now, I am also over confident. I make some mistakes cutting triangles too big when I drape the seat back. There are some gaps between the arm rest and the sides of the seat that I did not encounter with the first chair. The welt is entirely perfect in the second chair, with no visible fraying ends, but overall I feel like the upholstery job benefited from the anxiety: the not as good chair has more visible mistakes even though it overall was more consistently done. There is a 100% chance no one else will notice.
As I near the end, I start to get excited. I text my brother, a fellow craftsman with exquisite taste, a picture of the second chair. “I did this!” He is impressed, which is meaningful because he knows what it is that I basically did, and wouldn’t say he is impressed if he were not.
I realize that a strict before and after, leaves out more of the story than I am really comfortable with, and that I was relying on my brother to know what the steps were when I sent him the pictures. I start to think about my friend who gifted me the chairs – who also knows the work I have put in – and how she will be pleased with what I have done with her old chairs.
And then just like that: I’m all done.